How to tell if a sprinkler controller is bad?
Keeping a healthy lawn in the US often comes down to one small but powerful device the sprinkler controller.
When it works, you hardly think about it. But when it starts acting up, the signs can be confusing. I learned this the hard way when my backyard suddenly had dry patches even though the system was “running” on schedule.
At first, I thought the sprinkler heads were clogged. After digging deeper, I discovered the real culprit was my aging sprinkler controller.
If your lawn looks overwatered in some spots and bone-dry in others, or your system refuses to run on schedule, your controller may be failing.
In this guide, I’ll share the most common signs of a bad sprinkler controller, what I personally checked in my own system, and how you can troubleshoot before spending money on a replacement.
By the end, you’ll know whether your controller is the problem and how to decide on your next step.
A lush, green lawn and a thriving garden are the pride of any homeowner. They don’t just happen by accident; they’re the result of careful planning and consistent care. At the heart of a healthy landscape is a reliable irrigation system, and the brain of that system is the sprinkler controller. This little box, often tucked away in a garage or on the side of your house, is what tells your sprinklers when to turn on and for how long. It’s the silent partner in your gardening efforts, and when it stops working, the consequences can be disastrous for your lawn—and your water bill.
I learned this the hard way. A few years ago, I noticed my lawn was looking a bit patchy. At first, I thought it was just the summer heat, but then my water bill arrived and it was through the roof. After a little investigation, I found the culprit: my old sprinkler controller was malfunctioning. It was randomly running for hours at a time, sometimes in the middle of the night, and I had no idea. It was a frustrating and costly lesson, but it taught me just how vital a working controller is. It’s not just about convenience; it’s about water efficiency and protecting your landscape investment
Table of Contents
ToggleWhat a Sprinkler Controller Does
Before you can fix a problem, you need to understand the system. A sprinkler controller, or timer, has three primary functions that work together to automate your lawn and garden care.
Basic functions: timing, zoning, and automation
- Timing: This is the most basic function. The controller allows you to set specific start times and run durations for your watering cycles. You can program it to water at the most optimal times, like in the early morning when the sun is not as intense and the wind is calm, which minimizes evaporation and ensures the water reaches the root system.
- Zoning: A typical yard is divided into different irrigation zones. You might have one zone for your sunny front lawn, another for a shady side yard, and a third for a garden bed. Each of these zones has different watering needs. The controller manages each zone independently, so you can program the front lawn to run for 20 minutes while the garden bed only runs for 10. This precision is key to a healthy landscape and to preventing water waste.
- Automation: The controller automates the entire process. Once you’ve programmed your watering schedule, you don’t have to think about it again. The controller will automatically turn on and off your sprinklers at the right time, so you can spend your time enjoying your yard, not worrying about watering it.
Role in water efficiency
A properly functioning controller is the single most important tool for water efficiency in your landscape. It ensures that your yard receives the right amount of water at the right time, so you’re not overwatering or wasting water. Many modern, smart controllers even have advanced features like weather sensors that can automatically skip a watering cycle if it’s raining, or adjust watering times based on local temperature and rainfall data. This can lead to significant savings on your water bill and a healthier landscape.
Signs of a Bad Sprinkler Controller
So, how do you know if your sprinkler controller is the problem? Often, the signs are subtle at first but become more obvious over time. It’s important to recognize these symptoms early on to avoid a costly repair or a dead lawn.
Overview of common symptoms before diving deeper
- No Power: The most obvious sign is when the display is completely dead.
- Unresponsive Controls: You try to program it, but the buttons don’t work or the touchscreen is frozen.
- Random Watering: The system turns on at odd times or for durations you didn’t program.
- Zone Malfunctions: A specific zone won’t turn on or won’t turn off.
- Inconsistent Timing: The system runs for a few minutes and then stops, or the time of day is constantly wrong.
If you’re experiencing any of these issues, it’s a strong signal that your controller might be failing.
Controller Does Not Power On
This is the most common and often the most frustrating symptom of a failing controller. You look at the display, and there’s nothing—no lights, no numbers, just a blank screen.
Dead display or blank screen
A blank screen on your controller is a clear indication of a power issue. It could mean the unit has failed completely, but it’s more likely to be a problem with the power source. Before you call a professional or rush out to buy a new unit, you should always start with a basic diagnostic check.
Checking power source
First, check the outlet the controller is plugged into. The most common cause of a dead controller is a simple power outage or a tripped circuit breaker. Use a nightlight or a phone charger to test the outlet and make sure it’s receiving power. If the outlet works, check your home’s main electrical panel to see if a breaker has been tripped. If the breaker is fine, then the problem is likely with the controller’s transformer. The transformer is the small box or cord that converts your home’s electrical power to the low voltage needed for the controller. These can fail over time due to power surges or simply old age. If the transformer is the issue, it’s a simple and affordable replacement
Unresponsive Buttons or Touchscreen
If your controller has power but you can’t get it to do what you want, you might be dealing with a problem with the user interface.
Difficulty programming schedules
You’ve pressed the buttons or tapped the screen, but nothing happens. This can be frustrating, especially if you’re trying to set a new watering schedule. This could be caused by a faulty button, a dead touchscreen, or even a software issue. If your controller has a battery backup, a weak battery could also cause the controls to become sluggish or unresponsive. Try replacing the battery to see if that fixes the issue.
Stuck or unresponsive controls
Sometimes, a single button on a controller can get stuck. This can cause a number of problems, from a zone that won’t turn off to a cycle that won’t start. If you suspect a stuck button, you can try to gently press on it a few times to see if it frees up. If you have a touchscreen, you can try to reboot the controller by unplugging it and plugging it back in. If the problem persists, the issue is likely with the internal electronics.
Erratic or Missed Watering Schedules
You’ve got your sprinkler controller programmed for a perfect 4 a.m. watering cycle, but a few days in a row, you wake up to a dry lawn. Or worse, you find your sprinklers running randomly in the middle of the afternoon. This is one of the most common and frustrating signs that your controller is on its way out. The system’s internal clock or memory is failing, leading to unpredictable behavior that can ruin your landscape and waste water.
Zones not activating at scheduled times
This is a classic sign of a failing controller. You’ve gone through the steps to set up your program—you’ve set the start time, the days of the week, and the run duration for each zone—but when the time comes, nothing happens. The controller might seem like it’s running through its cycle on the screen, but it’s not actually sending the signal to activate your sprinkler valves. This can be caused by a corrupted internal program or a faulty circuit board that is unable to send the correct signal to the solenoids. The result is a thirsty lawn and a lot of head-scratching.
Random on/off patterns
Equally frustrating is when your sprinkler system begins to turn on at seemingly random times or runs in an erratic pattern you didn’t program. A zone might run for 30 minutes, then turn off for a few minutes, then turn back on for another 15. This kind of erratic behavior is a clear indication that the controller’s internal relays are sticking or its circuit board is shorting out. It’s a significant problem because not only does it lead to massive water waste, but it can also stress your plants, which prefer consistent, deep watering.
Only Some Zones Work
This is a very specific symptom that can help you pinpoint whether the problem is with your controller or with your wiring and valves. One day, you notice that your front yard is lush and green, but the grass in your backyard is starting to look brown and dry. The system is running, but only some of the zones are getting water.
One zone running fine while others fail
This is a great diagnostic tool. If you have a multi-zone system and only one or two zones aren’t working, the problem is more likely a mechanical or wiring issue with those specific zones. The controller is still functioning correctly for the other zones, which means it’s doing its job of sending the signal. The problem is likely a broken wire, a faulty solenoid (the small electrical part on the sprinkler valve that gets the signal from the controller), or a physical issue with the valve itself.
Potential wiring vs. controller issue
A controller issue is more likely if a whole group of zones stops working. For example, if all of your odd-numbered zones stop working at the same time, this could indicate a problem with a specific terminal on the controller’s main board. In this case, the controller is failing to send a signal to that entire group of zones. However, if just one zone is failing, the problem is most likely a broken wire or a faulty solenoid on that specific zone, which is a common issue and is often easier to fix than a full controller replacement.
Water Runs Continuously
This is a homeowner’s worst nightmare. You walk outside and notice that your sprinkler system is running, even though it’s not a scheduled watering time. When the scheduled time passes, the water doesn’t stop. This can cause significant damage to your lawn and landscaping, and it can lead to a very unpleasant surprise on your next water bill.
Valves stay open even after cycle ends
A valve that stays open is often caused by debris getting lodged in the valve’s diaphragm, which is a simple mechanical problem. However, if the valve itself seems fine and the water keeps running, the problem could be with the controller. A faulty controller could be sending a continuous “on” signal to the valve, essentially locking it in an open position. This can happen due to a short circuit on the controller’s circuit board.
How to tell if controller signals are stuck
You can try a manual test. Go to the controller and turn the zone off manually. If the water stops, then the controller’s programming is the issue. If the water continues to run, the problem is more likely a mechanical one with the valve itself. However, if you unplug the controller and the water still runs, then the valve has a physical problem, and the controller is off the hook.
Short Cycling
A healthy sprinkler system turns on, runs for its full programmed duration, and then turns off. A failing controller, however, might turn the sprinklers on and off rapidly, sometimes multiple times in a single minute. This is known as “short cycling.”
Sprinkler turns on and off rapidly
This rapid on-and-off behavior is a clear indication that the controller’s internal circuitry is failing. The controller is sending a signal to the valve to turn on, but it’s not holding that signal for the full programmed duration. This is not only a sign of a failing controller, but it’s also terrible for your landscape. Your plants are getting a series of short, shallow bursts of water, which is not enough to penetrate the soil and reach the root system. This can lead to a dry, unhealthy lawn and to dead plants.
Stress on system and plants
Short cycling also puts a huge amount of stress on your entire irrigation system. The constant on-and-off action can put a strain on your water pump, your valves, and even your sprinkler heads, potentially leading to costly repairs down the line. It’s a symptom that should not be ignored.
Display Shows Error Codes or Flickers
Many modern irrigation controllers have a digital display that can show you a variety of information, from the time of day to the current watering program. If you see a code on the display that you’ve never seen before, or if the display is flickering, it’s a sign that the controller is in trouble.
Interpreting manufacturer error messages
A digital display showing an error code is the controller’s way of telling you that something is wrong. The code could be something as simple as a “low battery” message, or it could be a sign of a serious internal problem. You’ll need to consult your controller’s manual to find out what the code means. It could be indicating a short circuit in the wiring, a faulty sensor, or a problem with the internal board.
Low voltage or board failure
A flickering or dim display is a classic sign of a low-voltage issue. This could be caused by a failing transformer or by a problem with the controller’s internal power supply. It could also be a sign of a board failure, where the circuit board is unable to provide a consistent power output.
No Signal to Solenoids
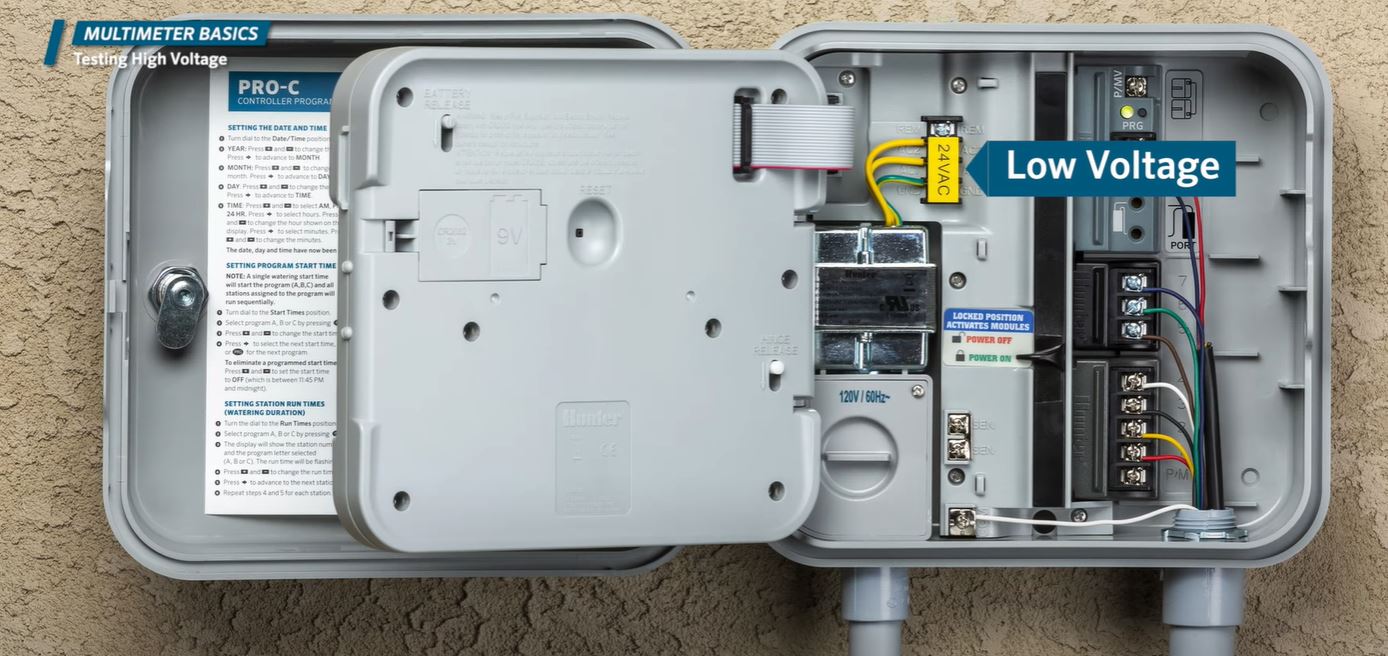
This is a more advanced diagnostic symptom that requires a little bit of technical know-how. If you suspect your controller is not sending a signal to your valves, you can test it with a tool called a multimeter.
How to test with a multimeter
A multimeter is an electronic tool that can measure voltage, current, and resistance. To test your controller, you would set the multimeter to the voltage setting, put the black probe on the common wire terminal, and put the red probe on the terminal for the zone you want to test. Then, you would manually turn on the zone from the controller. The multimeter should show a reading of around 24-28 volts.
When the controller is not sending proper voltage
If the multimeter shows a reading of zero or a very low voltage, it’s a clear indication that the controller is not sending a proper signal to the solenoids. This is almost always a sign of a bad controller, and it means the circuit board is failing to provide the necessary power to activate the valves. In this case, it’s time for a replacement.
Burnt Smell or Visible Damage
This is the most definitive and serious sign of a failing controller. If you see visible damage or smell something burning, it’s a clear indication of an electrical failure.
Signs of electrical failure inside the unit
Visible damage inside the controller, such as scorch marks on the circuit board, melted plastic on the terminals, or a burnt, smoky smell, is a sure sign of a serious internal problem. This can be caused by a power surge, a short in the wiring, or a lightning strike.
Safety concerns
If you notice any of these signs, you should unplug the controller immediately and do not try to fix it yourself. Electrical shorts can be dangerous, and a damaged unit is a fire hazard. It’s time to call a professional or to replace the unit.
Inconsistent Manual Operation
A common frustration for homeowners is when the sprinkler controller’s manual functions stop working as expected. You might have a new planting bed that needs extra water, so you go to the controller to manually activate the zone. You press the button, and nothing happens. This simple symptom can tell you a lot about the health of your controller.
Manual override not functioning
Every controller, whether it’s a basic timer or a smart hub, has a manual override function. This feature allows you to bypass the programmed schedule and turn a specific zone on or off. If this function is not working, it’s a strong indicator that the controller’s internal logic is failing. The processor is unable to correctly interpret and execute your commands. It’s a sign that the brain of your system is no longer communicating effectively with its components. This is a very different problem than a simple wiring issue; it points directly to an internal controller malfunction.
Comparing manual vs. programmed cycles
A great way to diagnose this issue is to compare the manual operation with a programmed cycle. If a specific zone works perfectly fine during its programmed watering time but won’t turn on when you try to activate it manually, the problem is almost certainly with the controller’s manual override function itself. This kind of selective failure is a classic sign of a board problem.
Weather Sensor Integration Fails
One of the key benefits of a modern smart controller is its ability to integrate with weather sensors or use online weather data to optimize your watering schedule. A controller that suddenly starts ignoring this information loses its most valuable feature.
Controller ignores rain or soil moisture sensor
If you have a rain sensor connected to your controller and you’ve recently had a significant downpour, your controller should automatically skip its watering cycle. If it doesn’t, it’s ignoring the signal from the sensor. This can be caused by a faulty sensor, but it can also be a sign of a problem with the controller’s sensor input. The same goes for soil moisture sensors—if the ground is saturated but the controller is running its program anyway, the controller’s internal logic is not correctly processing the input from the sensor. This can lead to overwatering, plant stress, and a much higher water bill.
Possible internal logic failure
When a controller fails to respond to external data like a sensor signal or a weather forecast, it points to a serious internal logic failure. The central processor that makes all the decisions is no longer functioning correctly. It’s like a computer that’s frozen and can’t respond to new commands. In these cases, the controller is losing its “smart” functionality, turning an expensive, modern device into an unreliable basic timer.
Battery Backup Problems
Most sprinkler controllers have a small battery backup, usually a coin-cell battery, that keeps the time and your programmed schedules in memory in case of a power outage. This feature is designed to prevent you from having to reprogram the entire system every time the power flickers.
Controller loses time settings after power outage
A common sign of a failing controller is when it loses all of its settings after a power outage. You come home after a storm, and the controller is blinking “12:00 a.m.” and all of your watering schedules are gone. This indicates a problem with the battery backup system. The small battery might have died, or, more seriously, the controller’s circuit board is no longer able to draw power from the battery to maintain its memory. This is a major inconvenience, and if the controller is old, it’s a sign that the internal battery connection or the board’s power regulation system is failing.
Battery corrosion or board issue
When you open the controller to check the battery, look for signs of corrosion. Leaking batteries can cause damage to the circuit board, leading to a permanent failure. If you’ve replaced the battery and the problem persists, the issue is with the controller’s internal circuit board itself.
Wi-Fi or Smart App Malfunction (For Smart Controllers)
For modern smart controllers, a strong Wi-Fi connection and a functioning app are essential. When these features stop working, the convenience and water-saving benefits of the device are completely lost.
Failure to connect with smartphone app
If you can’t connect your controller to your home Wi-Fi network, or if the connection is constantly dropping, it’s a big problem. Many smart controllers require a stable 2.4 GHz Wi-Fi network for optimal performance. While the issue could be with your router, it’s often a problem with the controller itself. The internal Wi-Fi antenna or the networking chip could be failing. This is a common issue for controllers that are placed far away from the router or that are exposed to a lot of wireless interference.
Dropped signals or lag in execution
Even if the controller is connected, it might not be working correctly. You might find that there is a significant lag between the time you press a button on your app and when the sprinkler system actually responds. Or the app might tell you that a zone is running when it’s not. This kind of inconsistent communication points to a problem with the controller’s internal processor or its ability to send and receive commands efficiently. At this point, the controller is not just a timer; it’s a smart hub that is failing at its core function.
How to Troubleshoot Before Replacing
Before you run out and buy a brand-new controller, it’s a good idea to perform a few basic troubleshooting steps. You might be able to fix the problem and save yourself some money.
Reset controller
The first and easiest step is to reset the controller. Most controllers have a reset button, which you can usually find by looking in the manual. You can also perform a “hard reset” by simply unplugging the controller for a few minutes and then plugging it back in. This can sometimes clear minor glitches and restore the controller to its proper working state.
Check wiring, fuses, and transformer
Another easy check is to look at the wiring. Make sure all the wires are securely connected to their terminals and that there are no visible shorts or damage. Many controllers also have a small fuse on the circuit board that can blow in the event of a power surge. You can check and replace the fuse if needed. Finally, check the transformer. You can use a multimeter to test the voltage coming out of the transformer. If it’s not reading around 24 volts, the transformer is likely the problem, and you can simply replace it.
Isolate whether the issue is valve or controller
If a single zone is not working, you need to determine if the problem is with the valve or the controller. You can do this by using a multimeter to check the voltage at the terminal for that zone. If the controller is sending a voltage, but the zone is not turning on, the problem is with the valve or the wiring. If the controller is not sending a voltage, the controller is the problem.
Professional Testing Methods
If you’ve performed all the basic troubleshooting steps and you’re still not sure what the problem is, it’s time to call in a professional. An irrigation technician has a few tools that can quickly confirm a controller failure.
When to call an irrigation technician
Call a professional when you have exhausted all your own troubleshooting methods and still can’t find the source of the problem. If you see signs of a serious electrical failure, like a burning smell or scorch marks, you should call a professional immediately.
Tools they use to confirm controller failure
An irrigation technician will use a multimeter to test the voltage at the controller terminals and to check the resistance of the solenoids. They can also use a specialized tool called a solenoid activator or chatterer. This tool can send a 24-volt signal directly to a valve’s solenoid, bypassing the controller. If the valve turns on, the technician knows the problem is with the controller. If the valve doesn’t turn on, they know the problem is with the valve or the wiring.
When Replacement is the Best Option
Sometimes, a repair is not the most cost-effective solution. There are times when it’s simply better to replace your controller with a new model.
Age of controller
If your controller is more than 10 or 15 years old, it’s likely nearing the end of its life. Older controllers are less efficient and lack the advanced features of modern models. The parts can be hard to find, and a repair might not be a long-lasting fix.
Cost of repair vs. new smart models
If a professional diagnosis confirms a major problem with the controller’s circuit board or internal components, the cost of the repair can be high. In many cases, the cost to repair an old, inefficient controller can be close to the cost of a brand new, highly efficient smart controller. A new smart controller, with features like Wi-Fi connectivity and weather syncing, can save you a significant amount of money on your water bill over time, making it a worthwhile investment.
My Experience Replacing a Bad Controller
For years, I dealt with a finicky sprinkler controller. It was a classic “set it and forget it” model—until it wasn’t. The display would randomly go blank, the schedule would get corrupted, and my lawn would go from green to brown in patches. I’d go out, reset it, and it would work for a few weeks before acting up again. This wasn’t just inconvenient; it was costing me money. I was wasting water on a system that ran at odd hours, and I was spending money on new grass seed to fix the brown spots caused by inconsistent watering.
Finally, I decided enough was enough. I bought a new smart controller and decided to do the replacement myself. The process was surprisingly straightforward. I took a photo of the old wiring, unscrewed the terminals, mounted the new unit, and re-wired everything. The real magic, though, happened when I connected it to my Wi-Fi and set up the program using the app on my phone.
The results were immediate and amazing. I could see the program running on my phone, and with the controller’s weather sync feature, it automatically skipped watering when it rained. My water bill dropped significantly, and my lawn has never looked better. The new controller, with its reliable signal and smart technology, turned a source of stress into a tool for convenience and savings. It taught me that sometimes, the best solution isn’t to constantly patch up an old problem but to invest in a modern upgrade that pays for itself over time.
Preventive Maintenance Tips
While a controller can eventually fail due to age or electrical issues, there are a few simple things you can do to prolong its life and prevent a sudden failure.
Seasonal inspection
Just like you would tune up your car or service your furnace, your sprinkler system needs a little seasonal attention. Before the watering season begins, open your controller and check the wiring. Make sure all the connections are clean and secure. Look for any signs of rust or corrosion. If you have an outdoor unit, make sure the door is sealed tightly to prevent moisture and bugs from getting inside. Run each zone manually for a few minutes to ensure everything is working correctly. This simple check can help you catch a problem before it turns into a major issue.
Surge protection and keeping unit dry
One of the biggest threats to your sprinkler controller is an electrical surge. A lightning strike or a power surge can instantly fry the circuit board, rendering the unit useless. You can prevent this by installing a surge protector for the outlet where your controller is plugged in. If your controller is outdoors, a quality, waterproof enclosure is crucial. Check the seal and make sure it’s free of cracks or damage. Keeping the unit dry and protected from the elements is one of the most effective ways to prolong its life.
Encouragement to upgrade for efficiency
While repairing a controller might seem like the cheapest option in the short term, consider the long-term benefits of an upgrade. Modern smart controllers with Wi-Fi and weather-sensing technology can save you a significant amount on your water bill. They take the guesswork out of watering and give you the ultimate control from your phone. Upgrading from an old, inefficient model is one of the best investments you can make in your landscape and your wallet. It’s a choice that not only solves the immediate problem but also provides convenience and efficiency for years to come.
FAQs
How long do sprinkler controllers last?
The lifespan of a residential sprinkler controller can vary widely depending on the quality of the unit and its environment. On average, a basic, entry-level controller will last around 5 to 10 years. Higher-quality, modern controllers are designed to be more durable and can last for 10 to 20 years or even longer. Factors like exposure to the elements (for outdoor models), electrical surges, and even the type of power supply can all affect a controller’s longevity. Proper maintenance, like keeping the unit dry and protected from surges, can significantly extend its life.
Can a bad controller damage valves?
Yes, in some cases, a bad controller can cause damage to your sprinkler valves. The most common way this happens is when the controller sends a continuous or “stuck” signal to a valve’s solenoid. A solenoid is the small electrical component on the valve that opens and closes it. If the controller is shorting out and sending a constant voltage to the solenoid, it can cause the solenoid to overheat and eventually burn out. A stuck or failing signal from the controller can also cause a valve to stay open, leading to continuous water flow and potential damage to the valve’s internal parts from constant pressure.
What is the average replacement cost?
The cost to replace a sprinkler controller depends on whether you do it yourself or hire a professional, as well as the type of controller you choose. A basic, traditional controller can cost anywhere from $45 to $150 for the unit alone. A modern, Wi-Fi-enabled smart controller, which offers advanced features and water savings, typically costs between $90 and $300 or more.
If you choose to hire a professional, the cost will include both the unit and the labor. Professional installation can add an extra $150 to $450 to the total cost. For a complete project, including a new smart controller and professional installation, the total can range from $200 to over $900, depending on the number of zones and the complexity of the job.