How to Use Electrical Tape on Exposed Wires (Step-by-Step Guide)
Exposed wires are more than just an eyesore they can be a serious safety hazard if left untreated.
From potential electrical shocks to the risk of fire, leaving wires uncovered isn’t something to ignore. Thankfully, one of the simplest and most effective temporary fixes is using electrical tape.
In this step-by-step guide, you’ll learn exactly how to use electrical tape on exposed wires safely, along with tips to make sure the repair is secure and reliable until a permanent solution is in place.
Navigating household repairs can be empowering, but when electricity is involved, safety must be the top priority. Exposed wires are more than just an eyesore; they are a significant hazard.
They can lead to painful and potentially fatal electric shocks, short circuits that damage appliances, and even house fires. While proper electrical repair always involves professional-grade materials and expertise, electrical tape can serve as a quick, temporary fix in certain minor situations.
This guide will walk you through the correct and safe way to use electrical tape on exposed wires, ensuring you understand its purpose, its limitations, and the critical safety steps you must take.
Table of Contents
ToggleWhy Exposed Wires Are Dangerous
Exposed wires are a serious safety risk because the protective insulation is no longer intact. This means a live, electrified conductor is left open to the environment.
- Risk of Electric Shock: Touching a live wire can send a powerful electrical current through your body, causing severe burns, muscle spasms, heart failure, or death. This is especially dangerous for children and pets who may not understand the threat.
- Risk of Fire: When exposed wires touch, they can create a short circuit. This causes an immediate surge of electricity that generates intense heat, which can easily ignite nearby dust, wood, or other flammable materials.
- Damage to Appliances: A short circuit can also send an electrical spike through your home’s wiring, frying sensitive electronics and appliances plugged into the same circuit.
How Electrical Tape Provides a Quick, Temporary Fix
Electrical tape, with its high insulation properties, can provide a quick, temporary solution to a minor problem, such as a small nick or tear in a wire’s outer sheath.
It acts as a new layer of insulation, preventing the conductor from making contact with other surfaces or with a person’s skin.
However, it’s crucial to understand that it is not a permanent solution. It is designed to buy you time until a proper, long-term repair can be made, either with a wire connector or by replacing the entire wire.
Understanding Electrical Tape
Before you use electrical tape, it helps to know what it is and the different types available.
What is Electrical Tape?
Electrical tape is a pressure-sensitive tape used for insulating electrical wires and other materials that conduct electricity. It is typically made from a flexible, non-conductive material like vinyl or rubber and coated with a strong adhesive. This combination of flexibility and insulation makes it perfect for wrapping around curved and irregular surfaces, such as wires and splices. The tape’s primary function is to prevent electrical current from escaping the wire, thus preventing shocks and short circuits.
Types of Electrical Tape Available
Not all electrical tapes are created equal. Choosing the right type for the job is essential for safety.
- Vinyl Electrical Tape: This is the most common type you’ll find in hardware stores. It’s made from PVC (Polyvinyl Chloride) and is very stretchy and flexible. It is rated for up to 600V and is excellent for most home applications, such as insulating wire splices, bundling wires, and minor repairs.
- Rubber Electrical Tape: Also known as splicing tape, this type is a non-adhesive, self-fusing tape made from rubber. It’s used for higher-voltage applications (up to 20,000V) and for creating a tight, moisture-resistant seal. It is more durable than vinyl tape but less flexible and is often used as a first layer under vinyl tape for added insulation and moisture protection.
- Silicone Self-Fusing Tape: This tape is a specialized, non-adhesive product that, when stretched and wrapped, fuses to itself to form a solid, watertight, and permanent rubber layer. It is highly resistant to heat and moisture and is often used for outdoor repairs or in harsh environments where a long-lasting, permanent seal is needed.
When Should You Use Electrical Tape?
Electrical tape is best used as a temporary solution for minor damage.
- Small Nicks or Cuts: If a wire’s outer insulation has a minor nick that hasn’t exposed the bare metal wire, a few tight wraps of electrical tape can secure it.
- Slight Fraying: If a wire is beginning to fray but the inner conductors are still intact, tape can be used to hold it together and prevent further damage.
- Temporary Wire Bundling: For organizing and bundling wires to keep them tidy, electrical tape is a perfect, non-permanent option.
Safety Precautions Before Using Electrical Tape
This is the most critical section of this guide. Before you even think about touching the wires, you must follow these safety steps.
Why Safety Comes First
Working with electricity is incredibly dangerous. A momentary lapse in judgment can have dire consequences. The golden rule is: never assume a wire is dead. Always test and double-check to ensure no current is flowing through the wires you’re about to work on.
Tools and Materials You’ll Need
- Electrical Tape: A high-quality, UL-listed vinyl electrical tape is a must.
- Non-Contact Voltage Tester: This is your most important safety tool. It allows you to test for electricity without touching the wires directly.
- Circuit Breaker Map: A clear, labeled map of your home’s circuit breaker panel will help you identify which breaker controls the correct circuit.
- Wire Cutters/Strippers: These are useful for trimming frayed ends if necessary.
Checking If the Wire is Live or Not
This step cannot be skipped.
- Step 1: Locate the Correct Circuit Breaker. Go to your home’s circuit breaker panel. Using the map, find the breaker that controls the outlet or light fixture connected to the exposed wires. If you don’t have a map, you’ll need to use a process of elimination by turning off breakers one by one and checking the corresponding outlets.
- Step 2: Flip the Breaker to the “Off” Position. A properly labeled breaker will be easy to find. Once you’ve located it, flip it to the “off” position.
- Step 3: Test with the Non-Contact Voltage Tester. Return to the exposed wire. Turn on your non-contact voltage tester and hold its tip near the exposed part of the wire. If the tester lights up, beeps, or vibrates, there is still power in the line. Do not proceed. Go back to the breaker panel and find the correct breaker, or call a professional. If the tester shows no power, it is safe to proceed.
- Step 4: Verify the Power is Off. Before touching the wire, test another outlet or light on the same circuit to confirm the power is indeed out. This adds an extra layer of safety.
How to Use Electrical Tape on Exposed Wires (Step-by-Step Guide)
With the power safely turned off, you can now begin the repair.
Step 1: Turn off the Power
As mentioned, this is the first and most crucial step. Locate the correct circuit breaker and turn it off. Confirm it is off with a non-contact voltage tester.
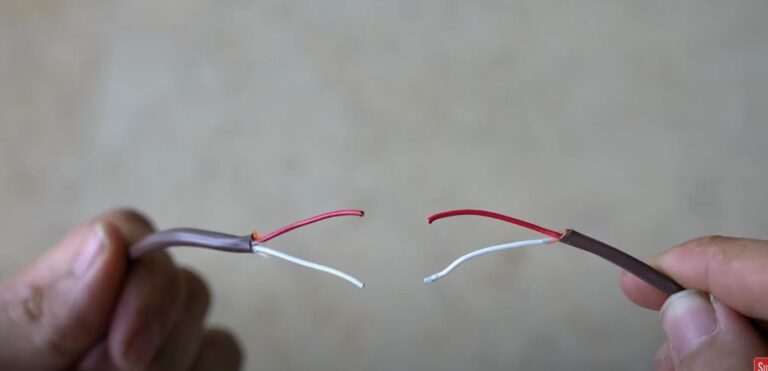
Step 2: Prepare the Wire
Inspect the exposed area. If there are any sharp, jagged edges on the remaining insulation, you can carefully trim them with wire cutters to create a smooth surface for the tape to adhere to.
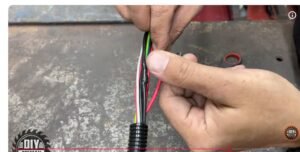
Step 3: Begin Wrapping the Tape
- Start the wrap about an inch or two away from the exposed area. This ensures the tape will have a strong bond to the intact insulation.
- Hold the tape at a slight angle to the wire.
- As you wrap, apply slight tension to the tape. This stretching is what allows the tape to conform tightly to the wire’s shape, creating a secure seal.
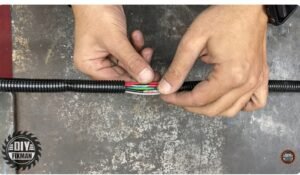
Step 4: Ensure a Tight and Secure Wrap
- Continue wrapping, overlapping each layer by about 50%. This overlap is essential for creating a strong, continuous layer of insulation.
- Wrap past the exposed area and onto the insulation on the other side by at least an inch.
- Continue wrapping for at least two to three layers, building up the thickness of the insulation.
- Once you’re finished, cut the tape cleanly and press the end down firmly to ensure it sticks.
Step 5: Test the Repair
- Return to the circuit breaker and turn the power back on.
- Plug in a device or turn on the light to verify the circuit is working.
- Do not touch the repaired area. Visually inspect it to make sure it looks secure.
When Not to Use Electrical Tape
While electrical tape is a handy tool, there are many situations where it is not a safe or acceptable solution. In these cases, you must call a professional electrician.
- Severed or Badly Damaged Wires: If a wire is completely cut or if a large section of insulation is missing, electrical tape is not enough to provide proper insulation. The wire must be replaced or properly spliced using a wire connector (wire nut).
- Wires in High-Traffic Areas: If the wire is in a location that is subject to physical stress, like under a rug or where it might get stepped on, electrical tape will not hold up. The tape’s adhesive can fail over time, and the pressure can cause the wire to short circuit.
- High-Voltage Appliances: Do not use electrical tape on wires for appliances that draw a lot of current, such as electric stoves, water heaters, or air conditioning units. These require specialized, heavy-duty repair that tape cannot provide.
- Wiring Inside Walls or Ceilings: Never use electrical tape on wiring inside walls, ceilings, or conduits. This type of wiring needs to be done according to strict electrical codes, and a temporary tape repair is not up to code and is a major fire hazard.
- Wires Exposed to Water or Extreme Temperatures: While some electrical tapes are moisture-resistant, a proper repair is needed for any wire that will be exposed to water or extreme heat. The tape can fail, leading to a dangerous situation.
In all these cases, a temporary fix with electrical tape is not worth the risk. A professional electrician has the tools, knowledge, and materials to do the job safely and to code, ensuring the long-term safety of your home and family.
Alternatives to Electrical Tape for Exposed Wires
For any repair beyond a minor nick in a wire’s sheathing, you should consider a permanent solution. Here are the most common and effective alternatives.
Wire Connectors and Wire Nuts
Wire nuts are a fundamental tool for any serious electrical work. They are small, conical plastic caps with a helical metal spring inside. When twisted onto the ends of two or more stripped wires, they create a tight, secure, and insulated connection.
- How They Work: The spring inside the wire nut bites into the metal conductors of the wires, twisting them together to create a strong mechanical bond. The plastic cap then insulates the connection, preventing a short circuit.
- When to Use Them: Wire nuts are the standard for splicing wires together, for instance, when connecting a new light fixture or outlet. They are also used to cap off unused wires in a junction box, providing a safe, insulated end.
- Why They’re Superior: Unlike electrical tape, which can unravel, dry out, or degrade over time, a properly installed wire nut provides a permanent, secure, and code-compliant connection. They are engineered to hold wires together under tension and to provide a superior level of insulation.
Heat Shrink Tubing
Heat shrink tubing provides a durable, professional, and often waterproof seal for electrical connections. It is a polymer tubing that shrinks to a fraction of its original size when exposed to heat.
- How It Works: A section of heat shrink tubing is placed over a wire splice or a damaged area. A heat gun is then used to apply heat, causing the tubing to shrink tightly around the wires, forming a durable, protective seal.
- When to Use It: Heat shrink tubing is ideal for repairing damaged insulation on wires, sealing connections that will be exposed to moisture, or bundling wires together in a neat, professional manner. Some types of heat shrink tubing have a layer of adhesive on the inside that melts when heated, creating a watertight bond.
- Why It’s a Great Alternative: Heat shrink tubing creates a seamless, rugged, and permanent protective layer that is resistant to abrasion, moisture, and chemicals. It provides a level of durability and protection that electrical tape simply cannot match, especially in harsh environments.
Liquid Electrical Tape
Liquid electrical tape is a brush-on, rubber-based coating that provides a flexible, waterproof, and durable layer of insulation. It’s an excellent choice for repairs on irregularly shaped connections or in hard-to-reach areas.
- How It Works: The product comes in a bottle with a brush applicator. You simply brush a few coats onto the exposed wire, allowing each layer to dry completely before applying the next. The liquid cures into a solid, rubbery, protective sheath.
- When to Use It: Liquid electrical tape is perfect for insulating wire connections in tight spaces, sealing cable ends to prevent fraying, or providing a waterproof coating for outdoor connections. It is particularly useful for sealing connections that are exposed to extreme weather or vibration.
- Why It’s a Unique Solution: Unlike solid tapes, liquid electrical tape fills every nook and cranny, providing a complete seal on complex shapes. Its flexibility makes it ideal for wires that are subject to movement, and its waterproof properties make it a go-to for outdoor or marine applications.
FAQs About Using Electrical Tape on Wires
Can Electrical Tape Fix Broken Wires Permanently?
No, absolutely not. This is one of the most dangerous misconceptions about electrical tape. It is a temporary, stop-gap solution designed to provide a quick fix until a permanent, code-compliant repair can be made. The adhesive on electrical tape will eventually dry out, lose its grip, and unravel, leaving the bare wire exposed and creating a major fire hazard. A broken or severed wire must be properly spliced with a wire nut or other approved connector, or the wire must be replaced entirely.
Is Electrical Tape Heat-Resistant?
The heat resistance of electrical tape varies depending on the type and brand. Most standard vinyl electrical tapes are rated for continuous operation up to 176°F (80°C). However, they are not designed to withstand the high temperatures that can be generated by an overheated wire or a short circuit. For high-temperature applications, specialized tapes (often silicone-based) are required. Always check the temperature rating on the product’s packaging.
Can You Use Electrical Tape Outdoors?
Yes, but you must use a tape that is specifically labeled as “all-weather” or “outdoor-rated.” Standard electrical tape can degrade quickly when exposed to sunlight, extreme temperatures, and moisture. UV rays from the sun can make the tape brittle and cause the adhesive to fail, while moisture can cause the tape to lose its grip. For outdoor repairs, a professional-grade, all-weather vinyl tape or heat shrink tubing is a much safer and more reliable choice.
Recommended Electrical Tapes for Home Repairs
When you do need electrical tape for a minor, temporary fix or for bundling wires, choosing a high-quality product is essential for safety and reliability.
- 3M Scotch Electrical Tape: The industry standard for a reason. Its superior adhesion, conformability, and durability make it a reliable choice for any home project.
- Duck Professional Electrical Tape: A great value option that provides a good balance of quality and affordability. It’s a step up from generic tapes, offering all-weather durability and a strong adhesive.
- AmazonCommercial Multi-Color Electrical Tape: Perfect for the DIYer who needs to organize and color-code. Its multi-pack offers great value and versatility for non-critical applications like labeling and bundling.
Final Thoughts
Electrical tape is a valuable tool, but it’s crucial to understand that it is a temporary solution and not a substitute for a proper, permanent repair. Always prioritize safety over convenience.
- Recap of Safety Tips: Always turn off the power at the breaker, verify it’s off with a non-contact voltage tester, and never work on live wires.
- Tape is a Stop-Gap: Use electrical tape for a quick fix on a minor nick or for bundling wires. For any significant damage, a wire nut, heat shrink tubing, or liquid tape is the correct and safe alternative.
- Call a Licensed Electrician: If you are unsure about the nature of the damage, if the wire is completely severed, or if the repair is in a critical area like inside a wall or ceiling, do not attempt to fix it yourself. Always call a licensed electrician. Their expertise and proper tools are the only way to ensure the safety of your home and family