How to Fix a Cut Wire with Electrical Tape (Step-by-Step Guide)
|

How to Fix a Cut Wire with Electrical Tape (Step-by-Step Guide)

Spread the love

A cut wire can be more than just an inconvenience it can be a serious safety hazard if left unattended.

From flickering lights to complete power failures, damaged wires put both your appliances and your home at risk. While calling an electrician is the safest choice for permanent fixes, there are times when a quick and reliable temporary solution is needed.

That’s where electrical tape comes in. In this step-by-step guide, you’ll learn how to fix a cut wire using electrical tape safely and effectively, ensuring your connection is insulated, secure, and ready for short-term use.

To fix a cut wire with electrical tape, you must first completely disconnect it from power. Then, cut away the damaged part, strip about 3/4 of an inch of insulation off the new ends, and twist the matching colored copper wires together tightly.

Wrap each individual twisted connection with electrical tape, ensuring no copper is exposed. Finally, wrap the entire repaired section with several layers of electrical tape to create a new, durable outer coating. This is a temporary fix for low-voltage cords only.

A cut or damaged wire isn’t just an annoyance—it’s a serious safety risk. Fixing it the right way is crucial to protect your home and family. Ignoring a damaged cord can lead to electric shocks, device damage, or even a fire.

  • Risks of leaving damaged wires exposed: A live wire with its protective coating gone is a major hazard. If someone touches the exposed copper, they could get a severe electric shock. The wire can also short-circuit, creating sparks that can easily ignite nearby materials like carpet, curtains, or furniture. This is a common, and preventable, cause of house fires.
  • When electrical tape is a safe temporary fix: Electrical tape is a fantastic tool for a quick, temporary repair on low-voltage cords. Think of things like lamp cords, phone chargers, or speaker wires. It’s designed to insulate the wire and stop electricity from going where it shouldn’t. However, it’s very important to understand that this is not a permanent solution. For any major appliances, wiring inside your walls, or for a long-term fix, you need a more robust repair, which usually means calling a professional electrician.

Understanding Wire Damage

Common Causes of Cut Wires

Wires get damaged in all sorts of ways, often just from daily life. Knowing how it happens can help you prevent it in the future.

  • Accidental cuts from tools: It’s easy to accidentally snip a cord with scissors, a vacuum cleaner, or garden shears. This often happens during home projects or routine cleaning when you’re not paying close attention to where cords are.
  • Pet chewing wires: Many pets, especially puppies, kittens, and rabbits, love to chew on things. An electrical cord can seem like a fun toy to them, but their sharp teeth can easily slice through the insulation and expose the dangerous wires inside.
  • Wear and tear over time: Cords don’t last forever. If a cord is constantly bent, pulled, or stepped on, its outer protective layer will eventually crack and fray. This is very common with cords for things that get moved a lot, like laptops or kitchen appliances.

Signs You Need to Repair a Wire

The damage isn’t always a clean cut. Be on the lookout for these warning signs that tell you a wire needs immediate attention.

  • Visible cuts or frays: This is the most obvious sign. If you can see the colored inner wires or the shiny copper strands through a break in the outer cord, it needs to be repaired or replaced right away.
  • Sparks or a burning smell:  If you see sparks or smell burning plastic near an outlet or a cord, unplug it immediately—but only if you can do so safely without touching the damaged area. If not, go to your circuit breaker and shut off the power to that room first. Sparks and burning smells mean you have a dangerous short circuit.
  • Flickering lights or malfunctioning devices: If a lamp flickers or a device randomly turns on and off, a damaged cord could be the culprit. The connection inside the wire may be loose, causing an unsteady flow of electricity.

Safety First

Safety Precautions Before Repair

Your safety is the absolute number one priority. Before you do anything else, you must follow these safety steps.

  • Turning off the power supply: This is the most important rule. Unplug the device from the wall outlet. If you’re working on something that’s hardwired, like a light fixture, go to your home’s breaker box and flip the correct circuit breaker to the “OFF” position. Never, ever work on a wire that could still have electricity running through it.
  • Using insulated tools: Always use tools with rubber or plastic-coated handles. These are called insulated tools, and they’re designed to protect you from electric shock if you accidentally touch a part that’s still live.
  • Checking for live current with a tester: Even after you’ve unplugged the cord or shut off the breaker, you should always double-check. A voltage tester is a simple, pen-sized tool that can tell you if a wire is live. Just bring the tip of the tester near the wire; if it lights up or beeps, there’s still power, and it’s not safe to proceed.

When Not to Use Electrical Tape

Electrical tape is useful, but it’s not the right tool for every job. Using it in the wrong situation can be extremely dangerous.

  • Severely damaged or melted wires: If a cord is deeply gashed, severely frayed, or has signs of melting, it’s beyond a simple tape fix. The damage is too great, and the entire cord or device needs to be replaced.
  • High-voltage applications: Never use electrical tape to patch cords for large, power-hungry appliances. This includes refrigerators, ovens, washing machines, dryers, and space heaters. They draw too much electricity, which creates heat that can melt the tape and cause a fire.
  • Long-term permanent repairs: An electrical tape repair should always be considered a temporary measure. Over time, the adhesive on the tape can dry out, causing it to unravel and expose the dangerous wire again. For a permanent fix, the cord should be replaced or properly spliced with wire connectors inside a junction box.
  • Wires inside walls: Never use electrical tape on the wiring inside your walls, ceilings, or floors. This work must be done by a licensed electrician to meet safety codes.
  • Wet or outdoor conditions: Standard black vinyl electrical tape is not waterproof. If the repair might get wet, moisture can seep in and create a shock hazard. For outdoor or damp locations, you need specialized, weatherproof connectors and techniques.

What Kind of Electrical Tape to Use?

Not all tapes are created equal. For this job, you must use real vinyl electrical tape. Do not use duct tape, packing tape, or masking tape. Those tapes are not designed to insulate against electricity and can easily catch fire.

Good quality electrical tape from a brand like 3M Scotch Super 33+ or a similar UL-listed product is your best bet. It’s designed to stretch, stick well, and provide excellent insulation against heat and electricity. It’s a small investment that makes a huge difference in safety.

Step-by-Step Guide to Fixing a Cut Wire

Follow these steps carefully for a safe and secure temporary repair.

Step 1: Gather Your Tools and Materials


Having everything ready makes the job go smoothly. You’ll need:

  • Wire Strippers/Cutters: This is the best tool for the job. It cuts wire cleanly and removes the plastic insulation without hurting the delicate copper strands inside.
  • Vinyl Electrical Tape: A fresh roll of high-quality electrical tape.
  • Voltage Tester: An essential safety tool to make sure the power is off.
  • Utility Knife (Optional): Can be useful for splitting the outer jacket of a thick cord.

Step 2: Disconnect Power and Prepare the Wire


First, confirm the wire is dead. Unplug the cord from the wall. Use your voltage tester one last time on the cut area to be absolutely sure there’s no power.

Next, you need to prepare the wire for splicing.

  • Cut Away the Damaged Part: Use your wire cutters to make a clean cut on both sides of the damaged section. Remove the frayed or broken part completely so you’re working with two fresh, clean ends.
  • Separate the Inner Wires: Most cords are made of two or three smaller wires bundled inside a main outer coating (the jacket). Carefully use your utility knife or wire strippers to split this outer jacket back about 2-3 inches on both ends. Pull the individual insulated wires apart gently. You’ll usually see a black wire and a white wire (and sometimes a green ground wire).

Step 3: Strip the Insulation

Now it’s time to expose the copper so you can reconnect it.

  • Use the Right Stripping Hole: Look at your wire strippers. You’ll see several small holes labeled with numbers (wire gauge). Find the hole that matches the thickness of your inner wires. If you’re not sure, start with a larger hole and work your way down. Using a hole that’s too small will cut the copper strands.
  • Strip About 3/4 Inch: Clamp the strippers about 3/4 of an inch from the end of a wire and pull firmly. The insulation should slide right off, leaving the shiny copper exposed.
  • Repeat for All Wires: Do this for every wire end. If you have a black and a white wire on each side, you will strip four ends in total.

Step 4: Splice the Wires

This is where you remake the electrical connection. Getting this right is crucial.

  • Match Colors: You must connect like colors to like colors. Take the exposed copper of the black wire from one side and the black wire from the other side. Do the same for the white wires. Never connect a black wire to a white wire. This will create a dead short and is extremely dangerous.
  • Twist the Wires Together: Twist the matched copper strands together tightly in a clockwise direction. A good, firm twist ensures a solid connection. A loose connection can heat up and become a fire hazard. If you have them, screwing on a wire nut at this stage is a much more secure and safer method than just twisting.

Step 5: Insulate Each Splice Individually


This is a critical safety step. You must make sure the two separate connections can never touch each other.

  • Wrap the First Connection: Start wrapping the electrical tape about an inch down on the insulation of one of the wires (for example, the black one). Stretch the tape slightly as you wrap—this helps it create a tight seal.
  • Overlap Generously: Wrap the tape diagonally, overlapping the previous layer by about half its width. Continue wrapping until you’ve completely covered all the exposed copper and have extended about an inch onto the insulation on the other side. Use at least two full, tight layers.
  • Repeat for the Second Connection: Now, do the exact same thing for the other splice (the white wires). When you’re done, you should have two separately taped connections.

Step 6: Insulate the Entire Repair


The final step is to bundle everything together to make the cord strong and safe again.

  • Wrap the Whole Section: Lay the two individually taped splices neatly next to each other. Now, start wrapping with your electrical tape about an inch onto the original outer jacket of the cord.
  • Create a New Jacket: Tightly wrap the entire area, bundling the two splices together. Continue wrapping back and forth, overlapping your layers, until your tape bundle is at least as thick as the cord’s original outer jacket. The finished repair should feel solid and secure, with no sticky sides or loose ends.

Step 7: Test Your Work


Now for the moment of truth.

  • Plug It In Safely: Plug the cord back into the outlet.
  • Power On: Turn on the lamp or device. It should work perfectly.
  • Check for Heat: After about a minute, unplug the device and carefully touch the repaired area. It should feel cool. If the taped section feels even slightly warm, you have a bad connection. Unplug it immediately. The repair is not safe, and the cord must be replaced.

Troubleshooting Common Issues

  • Device Doesn’t Turn On: You likely have a loose connection. Unplug the cord, remove the tape, and re-twist the copper wires to ensure they are making solid contact.
  • Repair Feels Warm or Hot: This is a serious fire hazard. It means electricity is struggling to get through the connection, creating resistance and heat. Unplug it immediately and do not use the cord again. It needs to be replaced.
  • Tape is Unraveling: This can happen if you didn’t stretch the tape as you applied it or if the tape is old or low-quality. A good tape job should stay sealed for a long time.

A Temporary Fix is Not a Permanent Solution

Successfully fixing a cut wire with electrical tape can save a favorite lamp or a useful device from the trash. When done correctly, it’s a safe and effective temporary repair for minor damage on low-power cords.

However, never forget that this is not a permanent solution. For any cord that is under a lot of stress, used for a high-power appliance, or for any wiring in your walls, always call a licensed electrician. When it comes to electricity, taking the extra step for safety is always the right decision.

Electrical tape is a handy tool, but it’s not a magic bullet for all wiring problems. Knowing when to avoid it is crucial for safety.

  • Severely Damaged or Melted Wires: If a wire’s insulation is melted, brittle, or charred, it’s a sign of a major electrical issue. Taping over this kind of damage is extremely dangerous and won’t fix the underlying problem. The wire’s core might be compromised, leading to a fire or shock hazard. In this case, the entire wire section must be replaced.
  • High-Voltage Applications: Standard electrical tape is designed for low-voltage residential use. Never use it to repair wires in high-voltage systems, like those found in industrial machinery or power lines. The tape’s insulating properties are insufficient for such high voltages and could lead to a catastrophic failure.
  • Long-Term Permanent Repairs: Think of electrical tape as a temporary bandage, not a permanent solution. While it can hold a repair together for a while, it’s susceptible to degradation from heat, moisture, and friction. For a durable, long-lasting fix, you need a more permanent method like heat shrink tubing or wire connectors.

Tools and Materials Needed


Before you begin, gather the right tools to ensure a safe and successful repair.

  • Electrical tape (high-quality, UL-listed): Look for tape with a UL (Underwriters Laboratories) listing. This certification means it has been tested and approved for safety and insulation.
  • Wire cutters/strippers: These are essential for making a clean cut and for stripping the insulation from the wire ends.
  • Voltage tester: This is a non-negotiable safety tool. It allows you to confirm that the power is completely off before you touch any wires.
  • Optional: heat shrink tubing for extra safety: This is a great way to reinforce your repair and protect it from the elements.

Step-by-Step Guide: Fixing a Cut Wire with Electrical Tape

Step 1 – Turn Off Power Supply

Why cutting off electricity is critical.

This is the most important step in any electrical repair. Working on a live wire can result in a severe electrical shock or electrocution. A shock can cause muscle contractions that make it impossible to let go of the wire, leading to serious injury or death. To de-energize the circuit, go to your home’s main breaker panel and flip the circuit breaker for the area you’re working on. If you’re unsure which breaker it is, it’s safest to turn off the main breaker for the entire house.

Step 2 – Inspect the Wire Damage

How to assess if tape repair is possible.

Once the power is off, take a close look at the damaged wire. A successful tape repair is only possible if the copper wire inside is intact and the damage is limited to the outer insulation. If the copper is cut, frayed, or broken, you’ll need to use a more secure method like a wire connector to rejoin the two ends. If the insulation is just a small nick or a clean cut, a simple tape wrap will suffice.

Step 3 – Prepare the Wire Ends

Cleaning frayed areas.

Aligning cut ends properly.

If the wire is cleanly cut in two, you will need to strip about one inch of insulation from each end. Be careful not to nick the copper wire. If the wire is frayed, use your wire cutters to trim the damaged section cleanly. Then, you can either twist the exposed copper ends together tightly or, for a stronger connection, use a wire nut. The purpose of this step is to ensure that the two ends make a solid, continuous electrical connection.

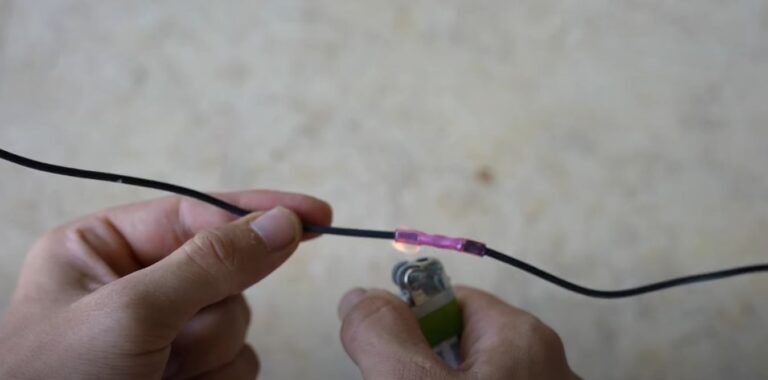
Step 4 – Apply Electrical Tape Correctly

Wrapping method for durability.

Overlapping layers for full insulation.

Start your tape wrap a few inches before the repair area. Wrap the tape tightly and smoothly around the wire, overlapping each layer by about half the tape’s width. This overlapping technique is crucial for creating a complete and uniform seal. Continue wrapping past the repair area for a few inches on the other side. The key is to apply enough tension to make the wrap secure without stretching the tape so much that it loses its stickiness.

Step 5 – Secure the Repair

Checking for gaps or loose tape.

Reinforcing with extra layers if needed.

After your first pass, take a moment to inspect the repair. Look for any air gaps, wrinkles, or loose sections of tape. If you find any, either re-wrap the area or add another layer of tape. A loose wrap can unspool over time, exposing the live wire and creating a major hazard. A good repair should feel solid and look smooth.

Step 6 – Test the Wire

Restoring power safely.

Testing the device or connection.

Once you are confident in your repair, go back to the breaker panel and turn the power back on. Plug in the device or turn on the light switch to test the connection. If the device works properly and there are no signs of arcing or flickering, the repair was successful. However, remember this is a temporary fix.

Tips for Better Wire Repairs with Electrical Tape

  • Use black electrical tape for strong insulation: Black electrical tape is typically made from a durable, high-insulation material like vinyl. Other colors may not have the same properties.
  • Apply tight, smooth wraps to avoid air gaps: Air gaps can trap moisture and weaken the insulation over time, compromising the repair.
  • Avoid stretching the tape too much: Overstretching makes the tape thin and reduces its insulating properties.

Alternatives to Electrical Tape for Wire Repair

Heat Shrink Tubing


How it works.

When to use it instead of tape.

Heat shrink tubing is a superior alternative to electrical tape. It’s a special type of plastic tubing that shrinks tightly around a wire when heated. It provides a waterproof, durable, and professional-looking seal. Use it for a more permanent repair or when the wire is exposed to moisture or extreme temperatures.

Wire Connectors

Safer for long-term fixes.

Easy for DIYers.

Also known as wire nuts, these are small, cone-shaped connectors that twist onto the ends of two wires to create a secure electrical connection. They are designed for a permanent and safe splice, making them ideal for long-term fixes inside a junction box.

Professional Repairs

When to call an electrician.

Some jobs are too complex or dangerous for a DIY fix. You should always call a professional electrician if you are dealing with high-voltage circuits, your home’s main electrical panel, or if you feel uncomfortable or unsure about any part of the repair.

Mistakes to Avoid When Fixing Cut Wires

  • Using regular tape instead of electrical tape: Regular tapes like duct tape or masking tape are not insulators. They can heat up and melt, creating a severe fire hazard.
  • Overlapping poorly, leaving gaps: Gaps in the tape wrap expose the live wire, creating a risk of electric shock.
  • Repairing live wires: This is the most dangerous mistake. Always, always, always turn off the power.

Maintenance & Monitoring After Repair

  • Checking regularly for wear: Periodically inspect the taped repair for signs of wear and tear, such as unraveling, cracking, or stickiness.
  • Replacing tape if it loosens: A loose tape wrap is a failed repair. Replace it immediately.
  • Planning a permanent fix: Remember that electrical tape is temporary. Plan to replace the taped wire or make a permanent repair as soon as you can.

FAQs on Fixing Cut Wires with Electrical Tape

  • Is electrical tape safe for all wires? No. It is designed for low-voltage, residential use only.
  • Can I fix extension cords with tape? It’s not recommended. Extension cords are often under stress and can be a trip hazard, which can loosen the repair. A proper, permanent repair with a cord repair kit is the safer option.
  • How long does an electrical tape fix last? It varies, but it should not be considered a permanent solution. It can last for months or even years in a stable environment, but its lifespan is unpredictable and depends on conditions like temperature, moisture, and physical stress.

Conclusion


Recap of safe steps to fix cut wires.

Reminder: electrical tape is temporary, not permanent.

Final tip: safety should always come first.

Fixing a cut wire with electrical tape can be a quick and effective temporary solution, but it requires care, knowledge, and an unwavering commitment to safety. By following the steps outlined, you can safely make a temporary repair. However, never forget that this is a stopgap measure. For a durable, long-term, and truly safe electrical system, always plan to replace the damaged wire or use a more permanent repair method. Remember, in any electrical work, your safety is the most important consideration. A moment of carelessness can lead to a lifetime of regret. Always double-check your work, and when in doubt, call a professional.

Similar Posts

Leave a Reply

Your email address will not be published. Required fields are marked *