Top 5 Best Greenhouse Heaters for Winter [2025 Updated]
Let’s be honest winter hits hard, and if your greenhouse isn’t ready, your plants are the first to suffer. I learned that the hard way a few years ago.
One cold snap, and boom all my leafy greens? Gone.
Frost doesn’t care how much time you’ve put into growing. Without proper heating, your greenhouse basically becomes a freezer.
This guide is for anyone who wants to keep their plants alive when the temps drop. Whether you’re a backyard gardener growing herbs year-round, a hobbyist trying to protect tropical plants, or even running a full-on greenhouse business, you need heat reliable, safe, and cost-effective heat.
Now, not every heater is built the same. That’s why I’m breaking down the main types you’ll find on Amazon:
-
Electric heaters (super popular and easy to use)
-
Propane heaters (powerful, great for off-grid)
-
Paraffin/kerosene heaters (cheap to run, a bit old-school)
-
Solar-assisted options (eco-friendly but tricky in deep winter)
I’ll walk you through what works, what to avoid, and what I’ve personally tested. If you’re tired of guessing or just don’t want to lose another plant to the cold, let’s get into it.
Types of Greenhouse Heaters: Which One’s Right for You This Winter?
When it comes to heating your greenhouse, one size does NOT fit all. The “best” heater really depends on your space, budget, power access, and how cold it gets where you live.
Let’s break down the main types of greenhouse heaters so you can make the right call without wasting money or risking your plants.
Electric Greenhouse Heaters
If you’ve got easy access to power, electric heaters are hands-down the most popular choice. They’re clean, safe, and super easy to control.
Most modern electric heaters come with built-in thermostats, so you can set it and forget it—no babysitting needed. I personally like them because they’re quiet, low-maintenance, and great for small to mid-sized greenhouses.
Best for: People with reliable power, looking for low-fuss heating
Watch out for: High electricity bills if you’re not using a thermostat or insulation
Propane Greenhouse Heaters
No power? No problem. Propane heaters are beasts when it comes to heating large or off-grid greenhouses.
They generate a ton of heat fast, making them ideal for harsh winter climates. I’ve used propane heaters in remote setups, and they saved my winter crops more than once.
Best for: Large greenhouses, off-grid growers, freezing climates
Watch out for: You’ll need proper ventilation—they produce carbon monoxide. Also factor in the cost of propane tanks.
Paraffin/Kerosene Heaters
These are the old-school champs. Paraffin or kerosene heaters are super budget-friendly and easy to set up.
They’re not as efficient or clean-burning as propane or electric heaters, but they get the job done for small greenhouses or people on a tight budget.
Best for: Emergency backups, hobbyists on a budget
Watch out for: Strong smell, moisture build-up, and lower heat output
Solar Greenhouse Heaters
In theory, solar is a dream free, renewable energy. But in practice? It’s a mixed bag during deep winter when the sun barely shows up.
You can use solar-assisted systems to offset your power costs, but don’t rely on them as your only heat source unless you live somewhere mild.
Best for: Mild climates, eco-conscious gardeners, supplemental heat
Watch out for: Weak performance in cloudy or snowy weather
Gas (Natural Gas or LPG) Greenhouse Heaters
If you’re lucky enough to have a natural gas line nearby, gas heaters are powerful, consistent, and more affordable to run long-term. I’ve used LPG heaters in commercial spaces—they crank out heat like no other. But you’ll need good airflow to avoid buildup of harmful gases.
Best for: Commercial greenhouses, those with access to natural gas
Watch out for: Installation costs, safety concerns, and ventilation requirements
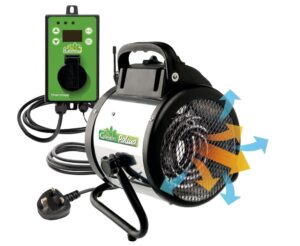
Bio Green PAL 2.0/GB 2KW Palma Heater Review A Reliable Greenhouse Heating Solution
Last winter, I needed a dependable heater for my small greenhouse setup. After reading reviews, I chose the Bio Green Palma Heater with the digital thermostat. I’ve used it for a full season now, and the results speak for themselves.
The first thing I noticed was how fast it warmed the space. With 2000 watts of power, it easily maintains consistent heat in my 10×10 grow area.
The adjustable thermostat helps dial in precise temperatures, which is great for delicate seedlings and overwintering plants.
The digital thermostat was a game changer. I set it to hold around 55°F, and the unit turns itself on and off automatically. It takes the guesswork out of maintaining a stable environment.
I also appreciate the fan-only mode. On warmer days, I switch to air circulation without heat. It keeps air moving, helps prevent mold, and stops hot spots around the plants.
This heater feels sturdy. The stainless steel body is built to last and handles rough handling without damage. The compact size makes it easy to move, and the foldable handle is a nice bonus.
It’s also IPX4 splash-proof, which means I never worry about watering or humidity affecting it. That extra layer of safety matters in a moist greenhouse setting.
After using this heater daily through cold nights, I can say it’s worth every penny. It works as advertised, it’s efficient, and it helped me grow healthier plants during the coldest months.
If you’re looking for a greenhouse heater with solid performance and reliability, this is one I’d recommend without hesitation.
| Pros | Cons |
|---|---|
| Powerful 2000W heating for small greenhouses | May be too powerful for tiny setups |
| Built-in digital thermostat with auto shutoff | Thermostat cable could be longer |
| Fan-only mode for air circulation | Display not backlit |
| Durable stainless steel housing | No remote control |
| IPX4 splash-proof for humid environments |
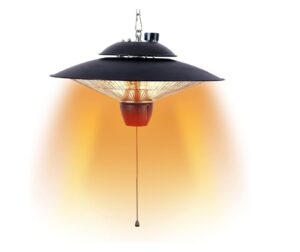
DONYER POWER Garden Halogen Heater Review Instant Warmth for Outdoor & Greenhouse Use
I recently installed the DONYER POWER ceiling-mounted patio heater in my backyard greenhouse. After using it for a few weeks, I can say this little unit packs a surprising punch.
It heats up fast. I mean, within three seconds you feel the warmth. On chilly mornings, that instant comfort helps both me and my plants adjust quickly.
I appreciate the two heat settings. I mostly use the 800W mode to keep a steady warmth during mild nights. On colder evenings, switching to 2000W gives the whole 65 sq ft area a noticeable boost in temperature.
Installation was simple. The 1-meter adjustable chain made it easy to find the right height. It’s lightweight and hangs securely without any hassle. I placed it at about 70 inches, out of reach from curious pets and kids.
The infrared heat is quiet and clean. There’s no fan noise or airflow, which means it doesn’t disturb leaves or seedlings. That’s a big plus for delicate greenhouse work.
It also looks sleek. The modern ceiling-mounted design blends well with both indoor and outdoor settings. I’ve seen it work just as well over a patio dining table during evening gatherings.
For the price, it’s a smart and energy-efficient heating option. The build feels solid, and the IP24 rating gives peace of mind for light rain exposure.
If you’re looking for an easy-to-install heater for greenhouses, balconies, or outdoor patios, this is worth considering. I’d happily recommend it for small spaces where fast, focused heat matters.
| Pros | Cons |
|---|---|
| Heats up in just 3 seconds | Only heats up to 65 sq ft effectively |
| Two heat settings (800W and 2000W) | No remote control |
| Great for both indoor and outdoor use | Not ideal for large open areas |
| Lightweight and easy to mount | Requires ceiling mount installation |
| Quiet infrared heating with no fan noise | No built-in thermostat |
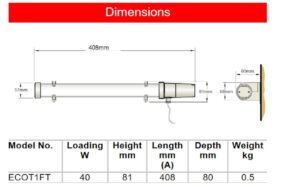
Dimplex ECOT2FT Tubular Heater Review A Reliable Frost-Proof Heating Option for Indoor Spaces
If you’re looking for a simple and effective way to prevent frost and chill in small spaces, the Dimplex ECOT2FT tubular heater gets the job done.
I installed this unit in my garage to keep it from freezing overnight. After weeks of use, I’m satisfied with how it performs.
This heater doesn’t blast heat like a fan unit. Instead, it quietly delivers a low, steady warmth that’s perfect for background heating.
My garage and shed now stay just above freezing, even when outdoor temps drop below 30°F.
I appreciate the built-in thermostat. It helps regulate the temperature without wasting energy. Once the space reaches the set level, the heater shuts off automatically. That’s a big win for energy savings.
Mounting was fast and easy. The discreet wall brackets kept it out of the way and safe from foot traffic. I also liked the reversible cable entry it gave me more flexibility with placement.
The slim design fits well under a bench or behind storage, and it blends nicely into the background. I barely notice it, yet it works consistently day and night.
This heater is a great choice if you need quiet, low-level heating for greenhouses, workshops, basements, or pet enclosures.
It’s not meant to heat an entire room fast but for frost protection or gentle warmth, it’s excellent.
| Pros | Cons |
|---|---|
| Built-in thermostat for automatic temp control | Not for large space heating |
| Quiet and discreet operation | No digital display |
| Energy efficient for long-term use | Limited to background warmth |
| Easy to install with included wall brackets | Basic design (no remote or timer) |
| Trusted brand with IPX4 splash resistance | Cord may be short for some setups |
Morris 2FT Tubular Heater Review A Compact Solution for Cold Spots
If you need low-energy background heat for a greenhouse, bathroom, or small room, the Morris 2FT tubular heater is a smart and budget-friendly option. I’ve used it through winter in my utility space, and it performs better than expected.
This 120W heater provides just enough warmth to keep chill and dampness under control. I mounted mine near the floor in a small garden shed. The gentle, consistent heat has helped prevent frost and protected tools and stored materials.
I like the built-in thermostat cutout. It gives peace of mind by preventing the unit from overheating. I’ve left it running for long hours, and it always feels safe and stable.
Installation was quick. The surface-mount brackets made setup straightforward. I mounted it to the wall using a drill and a few screws. The lightweight frame helped with placement and didn’t require any help.
The IP55 weatherproof rating makes a big difference. My space gets damp after heavy rains, but this heater continues working without issue. That kind of durability is rare at this price point.
If you want something that just works in the background without noise or big power bills, this little tube heater is a great choice. It fits neatly and runs quietly. It also comes in different lengths if you need more coverage.

| Pros | Cons |
|---|---|
| Compact and low wattage – ideal for small spaces | Not made to warm large rooms |
| Safe with thermal cut-out protection | No adjustable thermostat |
| Weatherproof IP55 rating | Lacks a power indicator light |
| Easy wall or floor mounting with included brackets | Simple design with no extra features |
| Quiet and efficient for frost protection | Limited to basic background heat |
LightHouse ECOHEAT 80W Greenhouse Heater Review – Low Watt, High Value
I needed something quiet and efficient to keep my small garden shed from getting too cold. After trying the LightHouse ECOHEAT 80W, I can say it’s a solid choice for anyone needing gentle heat control.
What impressed me most was how consistent the warmth stayed. It doesn’t blow hot air, but it keeps the chill off and stabilizes the temperature. Perfect for plants that can’t handle rapid swings.
I placed this heater along the bottom of a metal shelf. It gave off enough heat to protect delicate seedlings and small potted herbs. Even during frost warnings, the inside remained comfortable.
The power usage is super low. It runs using less energy than a regular light bulb. That’s ideal if you’re running it for long hours. I left it on overnight many times without seeing a spike in the electric bill.
It’s also dead silent. There’s no fan, no buzzing just steady warmth. For indoor use like greenhouses, workshops, or even a utility room, that quiet operation really adds value.
If you’re looking for a simple and eco-friendly heating option, this unit fits the job. It’s a small heater, but it delivers steady results with minimal effort. Worth a try for your plants or workspace.

| Pros | Cons |
|---|---|
| Very low energy consumption (under 50W/ft) | Not designed to heat large spaces |
| Stable heat helps prevent plant shock | No built-in thermostat control |
| Runs silently—perfect for quiet environments | Takes time to raise ambient temperature |
| Compact and discreet design | May need to pair with another for big areas |
| Eco-friendly and energy efficient | Limited temperature customization |
Key Features to Consider Before Buying a Greenhouse Heater
Let me tell you from experience, buying the wrong greenhouse heater can cost you time, money, and even an entire season’s worth of plants.
I’ve personally tested several options over the years, and some worked great, while others completely failed when it mattered most.
To help you make a smarter choice, here are the features that truly matter when picking a heater that fits your greenhouse and winter climate.
Thermostat and Temperature Control
A built-in thermostat is one of the most useful features in any greenhouse heater. It keeps your greenhouse at a stable temperature without you having to constantly check or adjust it.
I use heaters with digital thermostats because they give me better control and prevent overheating.
Why it matters: You save on energy bills and protect your plants from temperature swings
What I recommend:
Choose models with either built-in thermostats or the ability to connect external temperature sensors for more accuracy
Energy Efficiency Based on Wattage and Coverage Area
Wattage alone does not tell the whole story. What matters more is how much area the heater can cover effectively.
I once bought a high-wattage heater that barely warmed the middle of my greenhouse, and the corners stayed freezing. Do not make that mistake.
Why it matters: Efficient heaters give you better results without running up your power or fuel bill
What I recommend:
Check the manufacturer’s listed coverage area and match it to the size of your greenhouse
Safety Features Like Auto Shut-Off and Overheat Protection
This is absolutely critical, especially in enclosed greenhouse environments. A quality heater should have auto shut-off features that activate if the unit overheats or tips over.
I had one close call with a kerosene unit that started to overheat. Thankfully, it shut off on its own.
Why it matters: Safety protects your greenhouse, your investment, and your peace of mind
What I recommend:
Make sure electric models include overheat protection and tip-over shutoff. For gas or propane heaters, look for oxygen depletion sensors and use a carbon monoxide detector nearby
Size and BTU Capacity Matched to Your Greenhouse
BTU stands for British Thermal Unit, and it measures how much heat your unit produces. If the heater is too small for your space, it will run constantly and still not be enough.
If it is too powerful, you will waste energy and risk damaging your plants. I found the right balance by calculating my square footage and matching it to BTU output based on how cold my winters get.
Why it matters: The right size heater keeps your space warm efficiently without overuse
What I recommend: For colder states, plan for 200 to 250 BTUs per square foot, depending on how well-insulated your greenhouse is
Portability and Ease of Setup
Some heaters are bulky and awkward. I prefer units that I can easily move when needed, especially if I decide to rearrange things mid-season. A heater that is simple to set up and store is always worth it.
Why it matters: Easy setup and flexibility save time and make the heater more usable long term
What I recommend:
Look for compact models with carrying handles or lightweight frames. Avoid anything that needs complex installation unless you plan to keep it permanently installed
I have learned that a heater is not just a purchase; it is a commitment to your plants surviving winter. These features are not optionalthey are essential if you want peace of mind, reliable performance, and real results.
If you are unsure which model fits your setup, feel free to reach out or leave a question. I am always up for helping fellow growers figure out the right gear.
Greenhouse Heater Comparison Table
| Product | Heater Type | Coverage Area | Power Source | Safety Features |
|---|---|---|---|---|
| Bio Green PAL 2.0/US Palma Heater | Electric | Up to 120 sq. ft. | Electric (110V) | Overheat protection, stainless steel casing |
| Mr. Heater F232000 MH9BX Buddy | Propane | Up to 225 sq. ft. | Propane tank | Tip-over shut-off, low-oxygen sensor |
| Dyna-Glo RMC-55R7 Kerosene Heater | Kerosene/Paraffin | Up to 500 sq. ft. | Kerosene | Automatic shut-off, push-button ignition |
| Lasko 755320 Ceramic Space Heater | Electric (Ceramic) | Up to 150 sq. ft. | Electric (110V) | Overheat protection, cool-touch exterior |
| Dr. Heater DR218-1500W Greenhouse | Electric (Fan) | Up to 150 sq. ft. | Electric (110V) | Thermostat, overheat shut-off |
| Comfort Zone CZ220 Fan Heater |
How to Use a Greenhouse Heater Effectively (Without Wasting Heat or Burning Plants)
Buying a heater is just step one. If you don’t use it smartly, you could be burning through energy (or propane) and still end up with wilting plants.
I’ve done it wrong more than once so here’s what actually works:
Position the Heater Safely
Place your heater near the coldest part of the greenhouse, usually opposite the door or near vents. Make sure it’s on a stable surface, away from flammable materials like plastic, dry leaves, or mulch.
Pro Tip: Aim heat to flow across the greenhouse, not just blast one corner.
Use Insulation and Thermal Mass
A heater can only do so much if the greenhouse leaks heat like a sieve. Use bubble wrap, poly sheets, or insulated panels to cover walls and doors.
Add thermal mass (like water barrels or stone pavers) to absorb heat during the day and release it slowly at night.
This saved me money once I added insulation, I used half the energy for the same warmth.
Avoid Overheating or Cold Spots
Too much heat in one spot can cook your plants. Cold spots can still cause frostbite. Use a small fan to help circulate warm air evenly.
Combine that with a thermometer in multiple spots so you know what’s really going on.
Hack: Clip wireless temp sensors to different areas so you’re not flying blind.
When to Run It (Timing Strategies)
You don’t need to run the heater 24/7. Set your heater to turn on only when temps drop below your plant-safe threshold (usually around 45–50°F for most cold-tolerant veggies).
If you’re using propane or kerosene, this helps you stretch fuel much longer.
Smart Move: Use a timer or thermostat plug to control when it runs, especially overnight.
Common Mistakes to Avoid with Greenhouse Heaters
Don’t learn the hard way like I did. Here are the most common and costly mistakes most new greenhouse growers make in winter:
Overheating the Plants
Plants don’t want it to feel like summer. They just need to survive the frost. Too much heat causes leggy growth, stress, or even death. Always monitor temps and use thermostats when possible.
Ignoring Ventilation with Gas Heaters
Propane, kerosene, and natural gas heaters produce carbon monoxide and moisture. Without proper airflow, you’re creating a hazard for both plants and yourself.Always crack a vent or install a small exhaust fan when using gas heat.
Not Using a Thermostat or Timer
Manual heaters can easily run too long or not long enough. A good thermostat or plug-in temperature controller takes out the guesswork and keeps temps stable without constant babysitting.
Buying the Wrong Size Heater
This one’s huge. A tiny heater won’t do anything in a large greenhouse. A monster heater in a small space will fry your plants. Always match the BTU or wattage to your greenhouse size.Use this quick rule of thumb:
For mild climates – 150–200 BTUs per sq. ft.
For colder zones – 250–300 BTUs per sq. ft.
FAQ Greenhouse Heating in Winter
Can I use a regular space heater in my greenhouse?
Technically, yes but it’s not always the best choice. Most space heaters aren’t designed for humid or cold outdoor environments, and they lack the durability and safety features needed in greenhouses.
If you do use one, make sure it has a thermostat and tip-over protection and keep it away from water.
Is propane safe for enclosed greenhouses?
Yes, if used properly. Propane heaters generate serious heat and work well off-grid, but they also produce carbon monoxide and moisture. Always provide ventilation either through natural vents or a small exhaust fan and consider installing a CO detector for peace of mind.
What’s the cheapest way to heat a greenhouse?
The cheapest method is to combine passive heating with a small, efficient heater. Use:
-
Bubble wrap insulation
-
Thermal mass (water barrels, bricks)
-
A small electric or paraffin heater
This combo lets you maintain warmth without running high bills or burning gallons of propane.
How do I prevent condensation and mold in winter?
This is a big issue with winter heating. Warm air hitting cold surfaces causes condensation, which invites mold. To avoid it:
-
Ventilate daily (even a small fan helps)
-
Use a dehumidifier or moisture-absorbing materials
-
Heat evenly and avoid creating “cold corners”
Conclusion + My Personal Recommendation
I’ve tested a lot of heaters over the years electric, propane, kerosene — and I’ve learned this: you don’t need the most expensive heater, you need the right one for your greenhouse.
If you’re running a small to mid-size greenhouse with access to power, I personally recommend the Bio Green PAL 2.0/US Palma Electric Heater. It’s compact, efficient, and made specifically for greenhouses — not a generic space heater.
If you’re off-grid or have a bigger space to heat, Mr. Heater Buddy is my go-to. It’s reliable, portable, and puts out serious warmth. Just remember to ventilate.
Whatever you choose, don’t wing it. Take a few minutes to match the heater to your space, budget, and climate because the right setup will save your plants and your wallet all winter long.
Got questions or want to share your setup? Drop a comment below or reach out let’s geek out about greenhouse life.